Smoked Bone in Porterhouse
matthew wilson
Smoked Porterhouse, or our version of "Bistecca alla Fiorentina"
It's high BBQ season, and with the 4th of July coming up, I wanted to share one of my all time favorite recipes... SMOKED PORTERHOUSE!!! Ok, Ok, I know.... why would you waste time smoking an already amazing cut of meat. Season, sear and munch, right? Trust me, it's worth the effort and once you've tried it you'll find yourself in a pavlovian drool whenever you think about steak. Coincidentally, I've also tried bone in Ribeye (great but not the most copious output) and solo NY strip (which I didn't love, too tough). When it comes to smoking, the bone and the marbling are a big deal, which is why the strip alone wasnt great. The thickness is also very important. I'll share some tips that I've learned in my many, many, many, attempts....
1) go THICK and go dry aged! My favorite so far has been about 2-2.5 inches of porterhouse with the full T-bone. The dry aged at whole foods (which actually has really great beef where I live but is on the more expensive side), at 2.5" thick it was about $50.00. That is MORE that enough for 2-4, depending on how hungry you are. Keep and eye on the filet portion as well and make sure you get a nice big one.
2) FAT, is not you're enemy! It, as well as its reaction with fire, is one of the crucial flavors that everyone loves. Maker sure the butcher leaves a solid fat rind on the outside of the NY strip portion. I like to shave it down myself and use some of the fat for sauces or my favorite "huevos diablos con carne" (which I'll share soon as well).
3) BONE, BONE, BONE (..bone thugs in harmony?!) A good butcher will probably understand, but just make sure they leave both "process" on the bone. Those are the wings that make the "T", which are very important. These cuts are't very fatty and have little collagen to break down. That's usually the reason for long slow cooks & smoking. Since this cut is already soft, we are using it to saturate flavor and soften it up even more. The bone will help distribute heat to the thicker center in both cooking phases so you get and even cook with insanely soft and flavored meat.
4) Season and wrap it over night, or for a few hours at the least!
5) low and slow for the first cook, and BLAZING hot for the second.
not that we've gotten that laid down... here's the good stuff:
- 1 Bone in porterhouse cut to 2-2.5 inches thick
- 1 lobe of elephant garlic, or 1 clove of regular garlic sliced paper thin
- parchment paper and string
- sea salt
- pepper
- paprika
- mustard seed
- fresh rosemarry
- fresh thyme
- ground espresso
- smoker, charcoal grill, apple and mesquite wood chips (I use a https://masterbuilt.com/product/20070411-30-digital-electric-smoker/, and a regular charcoal grill)
PREPARATION:
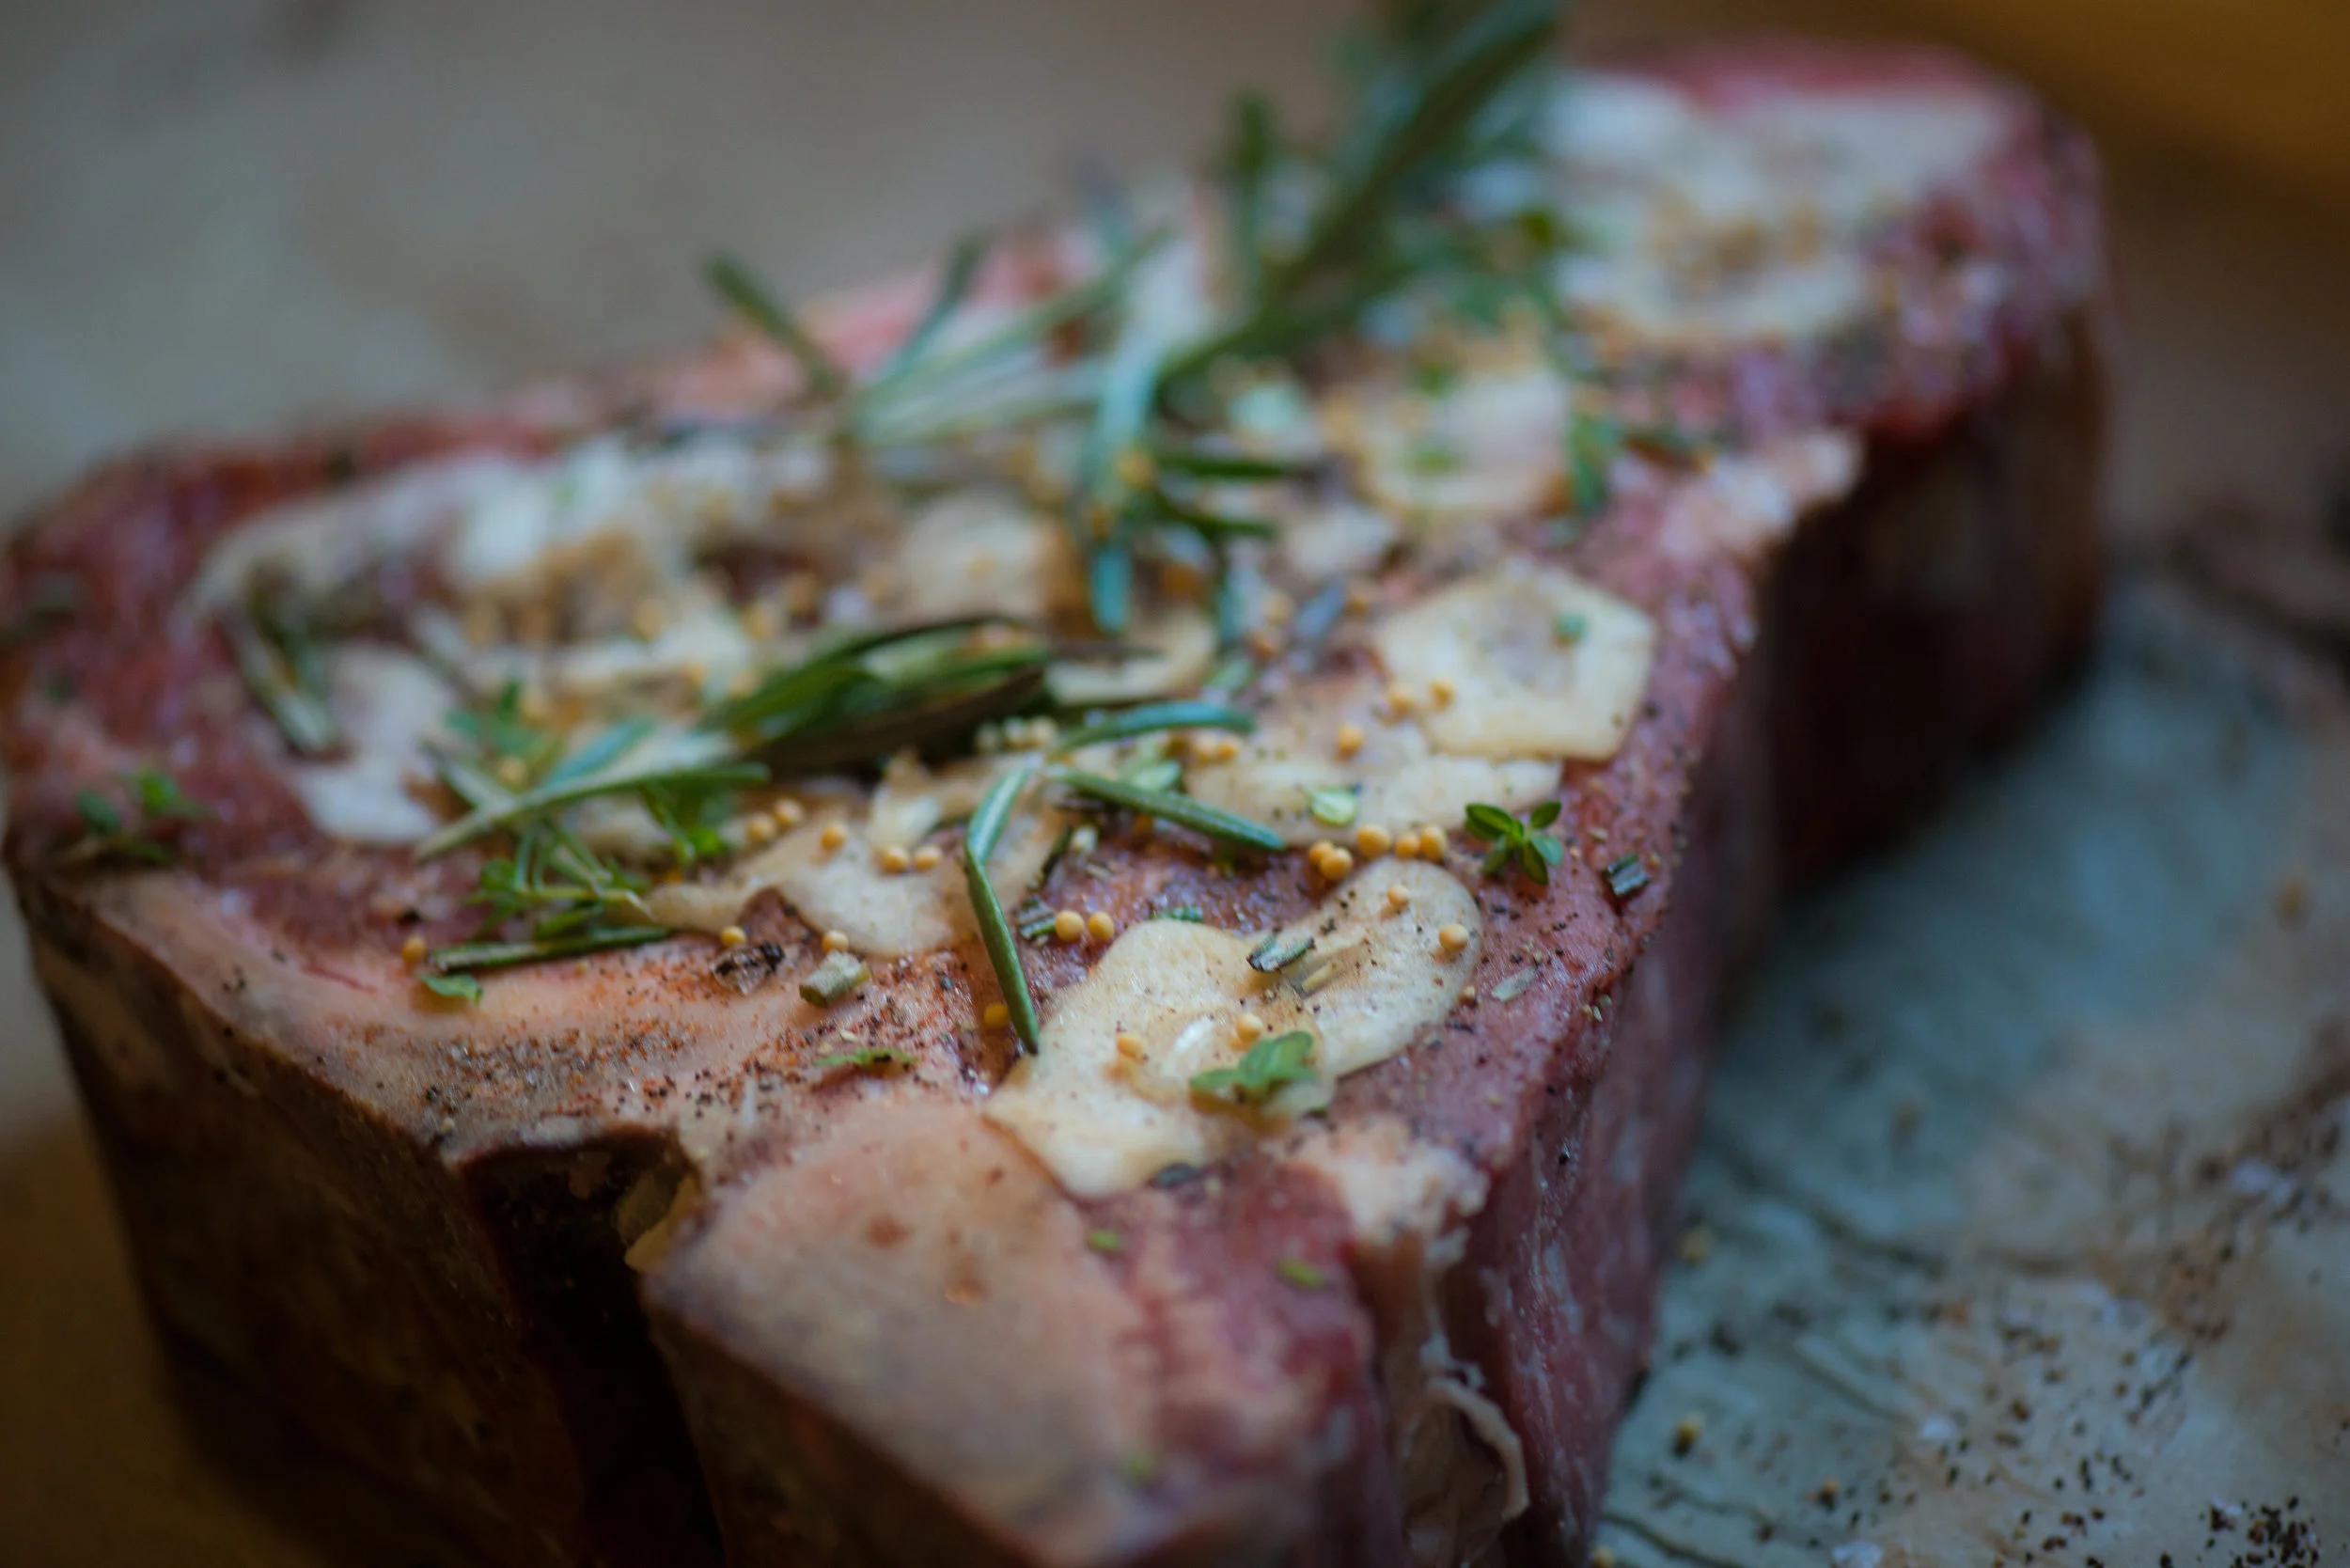
Shave down the fat rind to a uniform thickness, maybe several millimeters, depending on how evenly the fat is distributed. I try to shave it into paper thin sections so I can render that down and use it for other recipes. I also like to shave off any irregular or superficial pieces of meat. I love a good crisp but anything too small just turns to a charred gift to the fire gods.
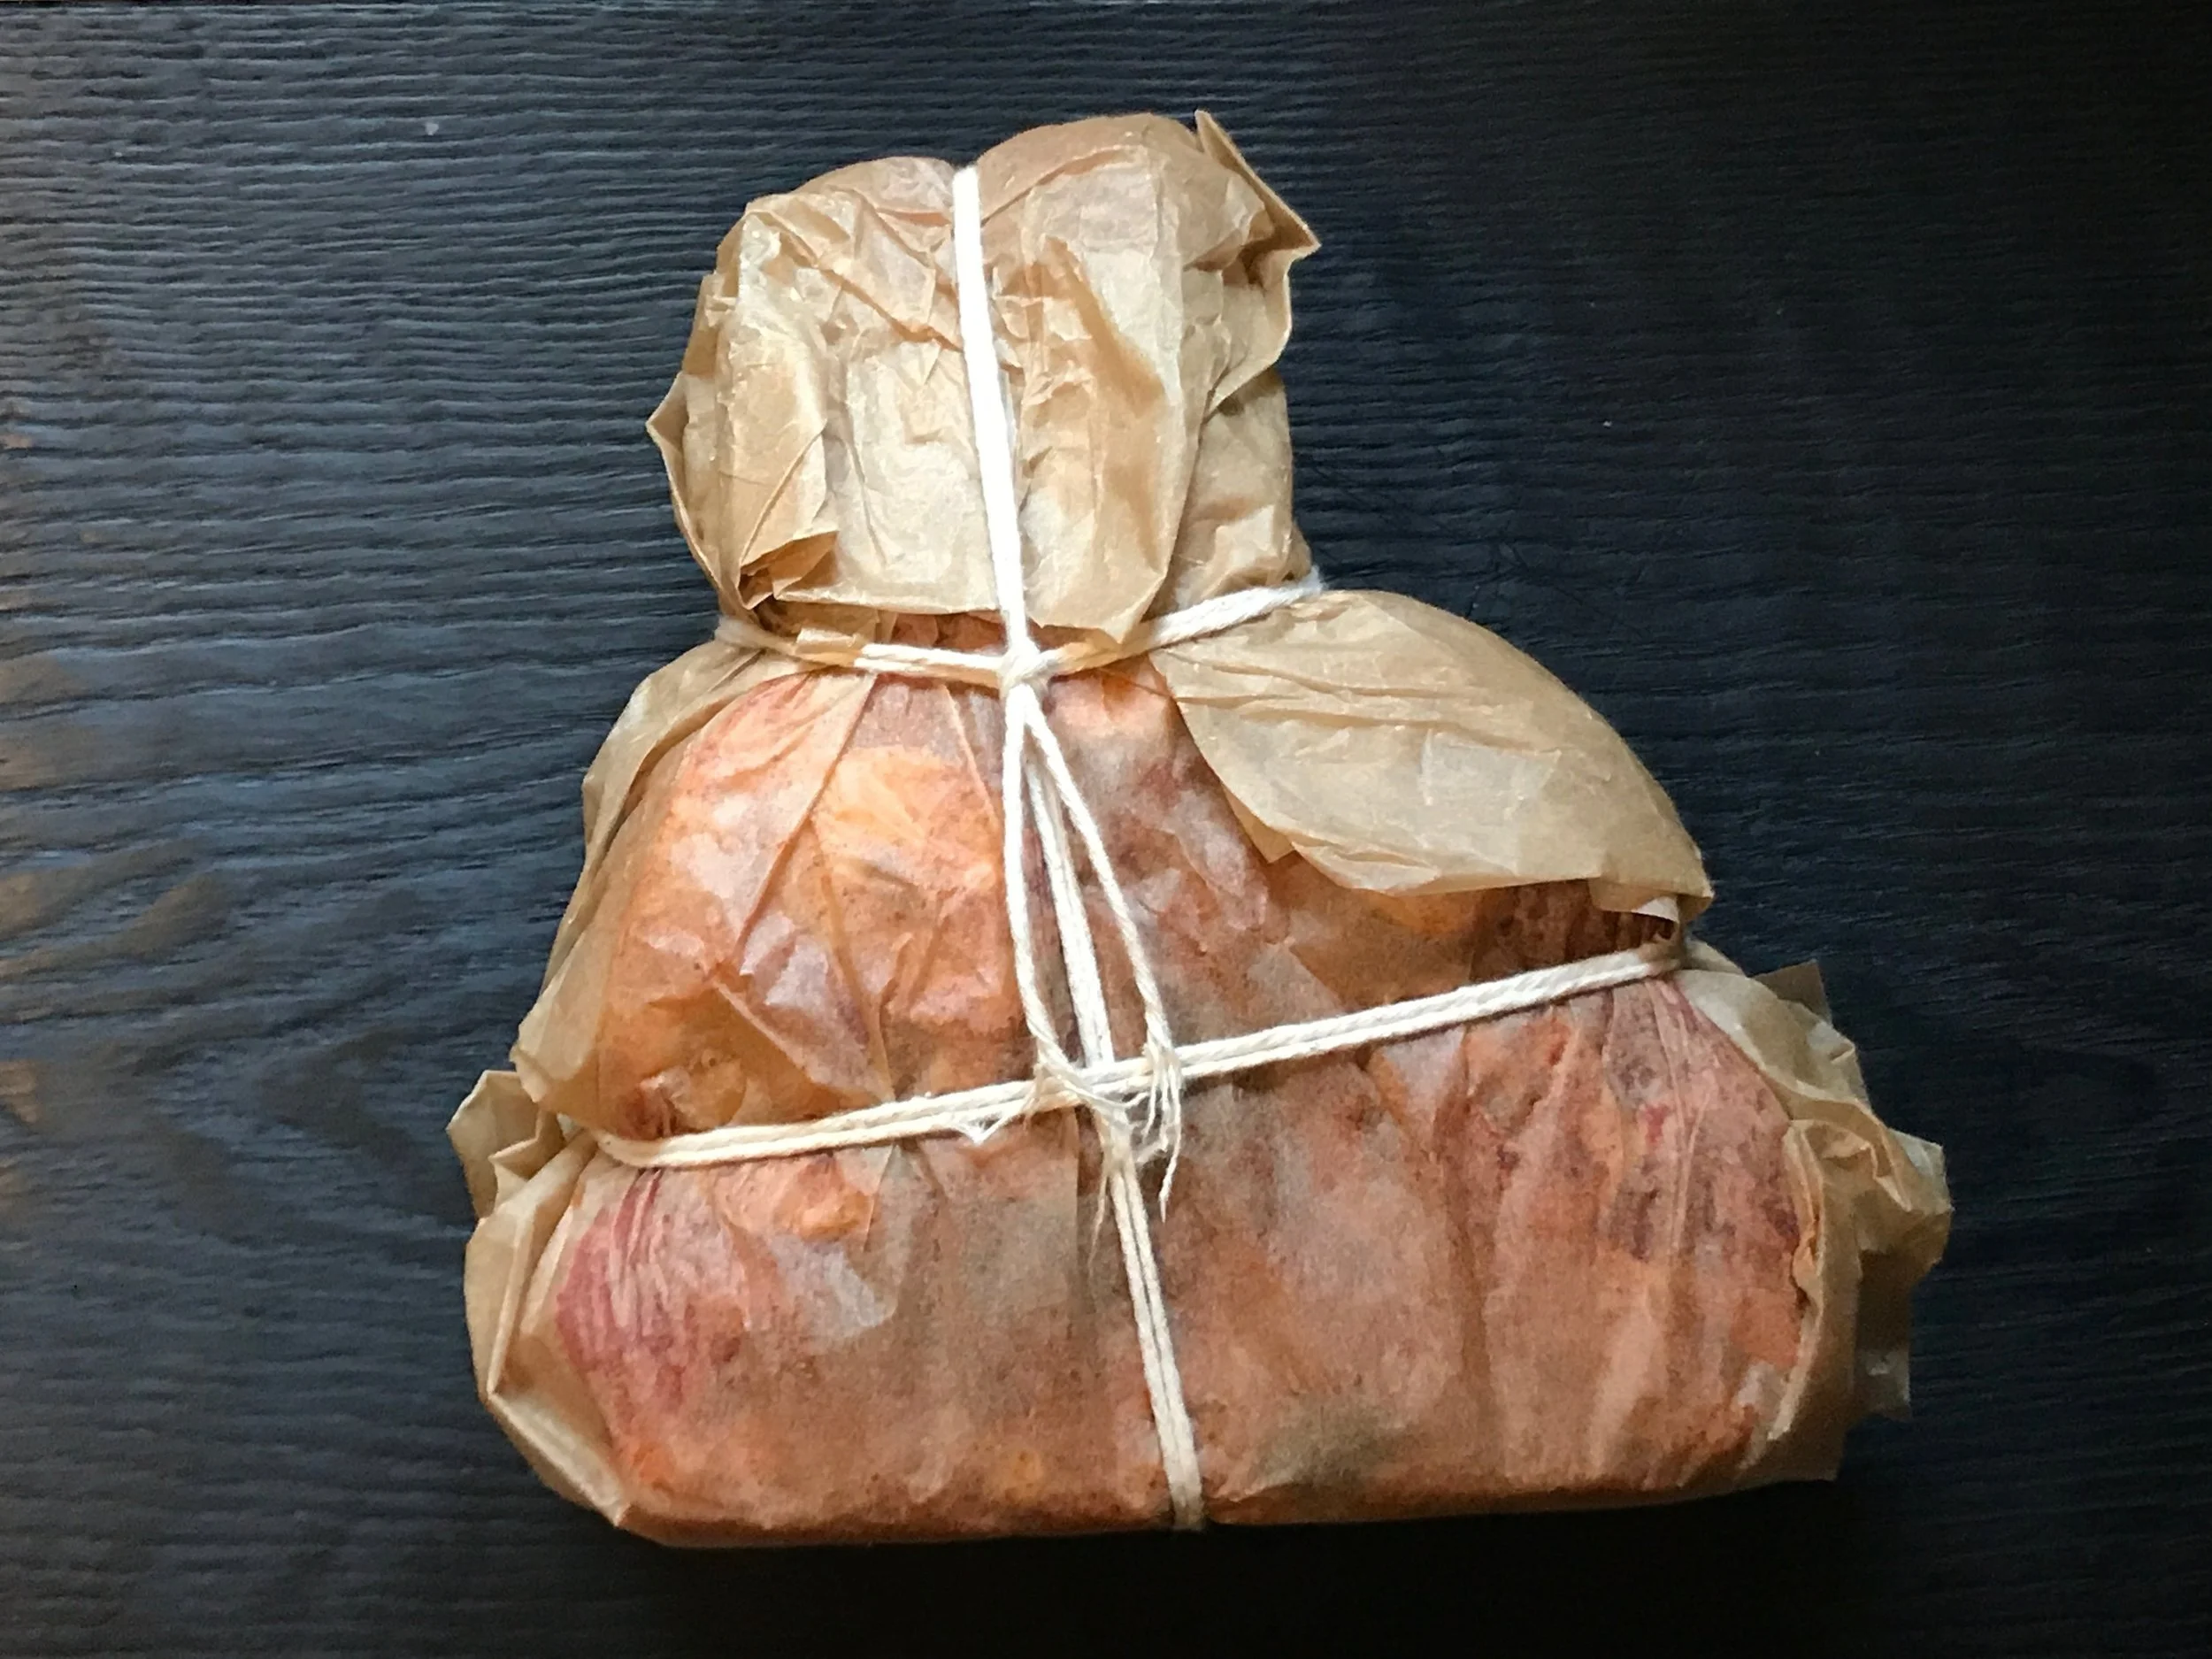
Start by laying out a large sheet of parchment paper. It needs to be large enough to wrap tightly around the whole steak. I also do all my seasoning on the paper so I dont loose anything that doesn't stick to the surface. Shave your garlic paper thin, salt and pepper both sides of the steak well (probably 1 teaspoon of coarse sea salt per side, and enough pepper to match). Then I start covering the steak in the garlic. Once there's a nice even coating of garlic I dust both sides with paprika, espresso (especially the fat) and mustard seed, then break the leaves off of the rosemarry and thyme and pepper each side with those. I usually throw a few whole stalks of herbs in the wrapping right at the end too.
...ready to wrap!
Now wrap it and tie it nice and tight before refrigerating overnight. This part is important, however if you go too long, (perhaps a few days), it starts to over season and taste more like pastrami.
The next morning, I unwrap these puppies, peel off all the garlic, and pat them down. The leftover herbs and garlic usually go into some sort of sauce.

Now we are ready for the smoker!
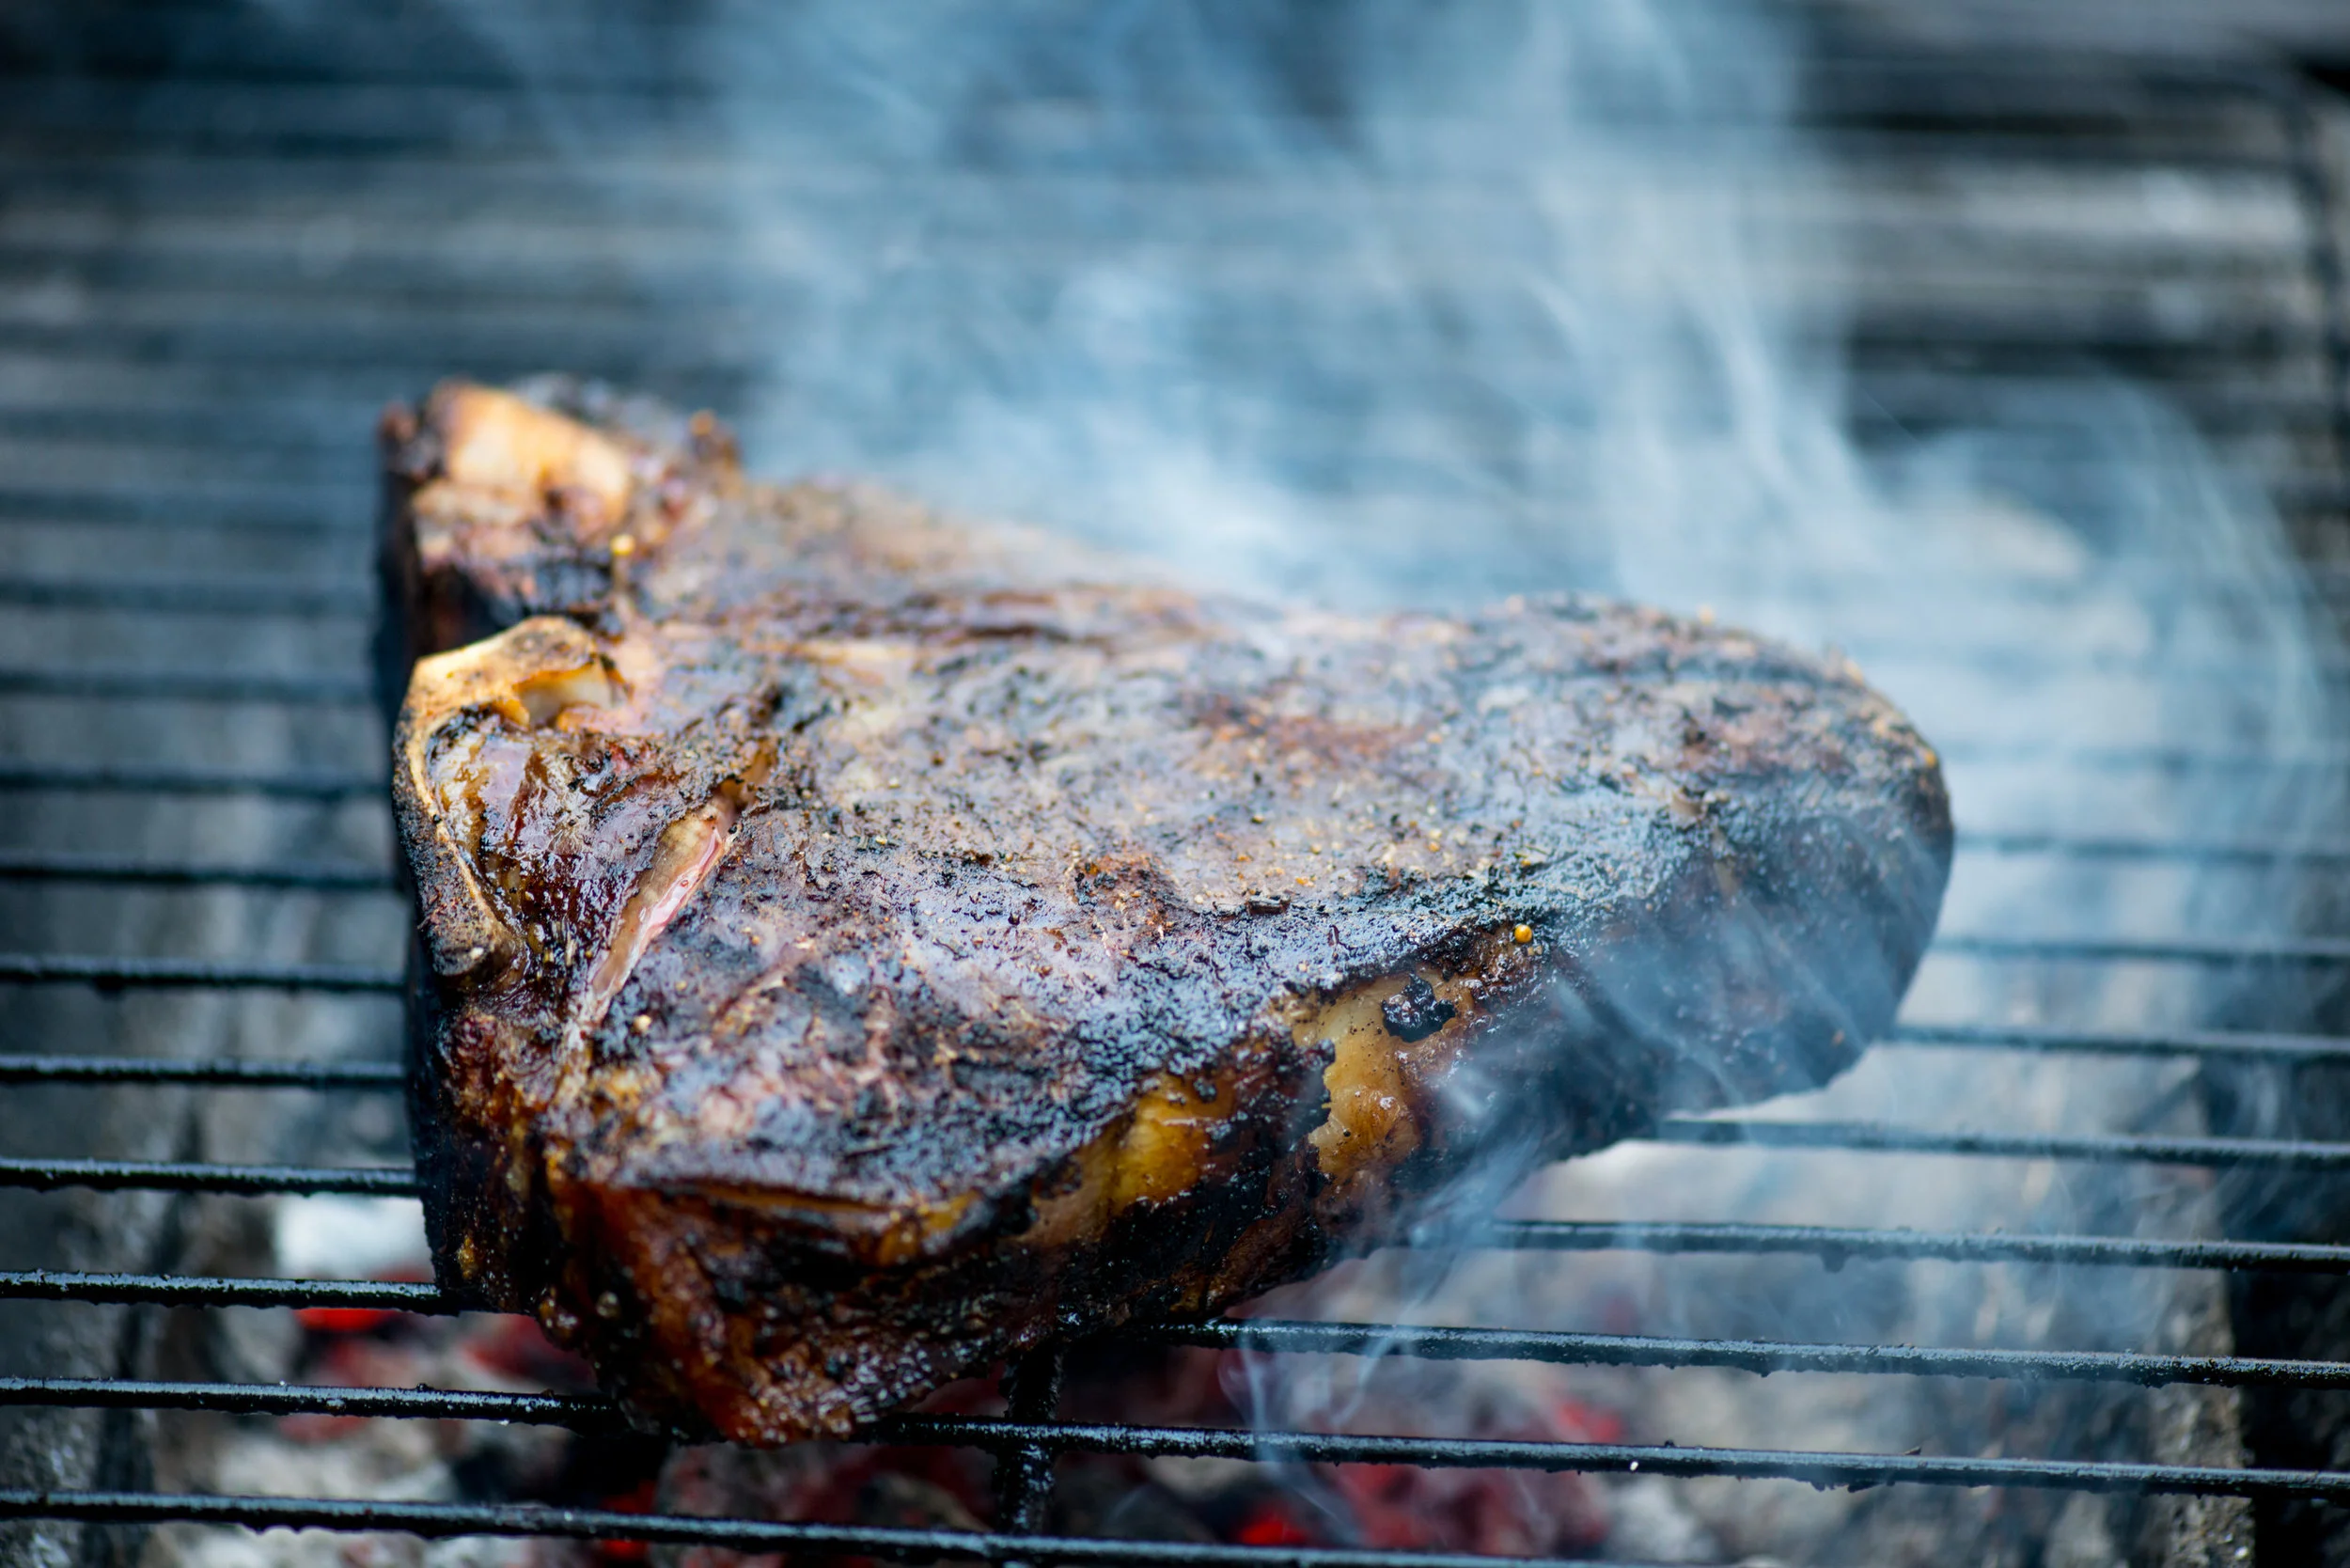
I start my smoker off at 225 to get a nice heavy smoke with apple wood. Once the smoke is flowing nicely, I like to drop the temperature way way down to about 170. My goal here is to get lots of smoke, and breakdown the internal marbling as much as possible in a reasonable amount of time, without really cooking the meat. If I want a nice rare cut, it has usually taken me around 4 hours in the smoker to get the meat up to 115. If you want it more well done, you can smoke it longer, but remember we're going to be grilling them as well. Even more than temperature, I like to look at the meat and specifically the fat to see the surface texture change. This long portion of the cook, is more about the flavor and texture of the meat than the final cook temp. You want the fat to become translucent and the meat to almost start to look candied.

getting there...

..., and, DONE!!!!
OK were ready to grill now! The meat should be close to the consistency of thick jello at this point, with just a tiny bit of sweat. Before we sear it, we want to let it cool down to room temp before cooking. The good thing about charcoal is that it usually takes the same amount of time to prep as the meat does to cool. (I'm a HUGE fan of royal oak natural lump charcoal .http://royal-oak.com.) It holds the temp just right once you've let them smolder to the right point.
The coals should be red hot, and edged with a layer of white ash. It should be hot to the point of not being able to put your hand over it for more than a second or so. I like to start on the bone end, standing straight up. That heats the up the bone nicely and simultaneously renders the fat rind enough the flame up the grill. This is the good stuff. The fat dripping onto the coals send up a bath of maillard reaction goodness, and the flames push the outer fat layers quickly there as well. However, too much flame is also not good, which is why I start bone down, and why it's important to have the butcher NOT shave it off. As the bone heats up you'll see the base start to bubble and creep up the interior process (it's mesmerizing to watch). Then I flip it over onto the long fat rind and let that go until its liquid inside and crispy outside. This is where the flames really start to go, so every once in a while if they are too much, just lift the steak up and let the flames die down. Next we flip it onto the faces, a few minutes each side, until it's an almond and golden brown, and crackling throughout.
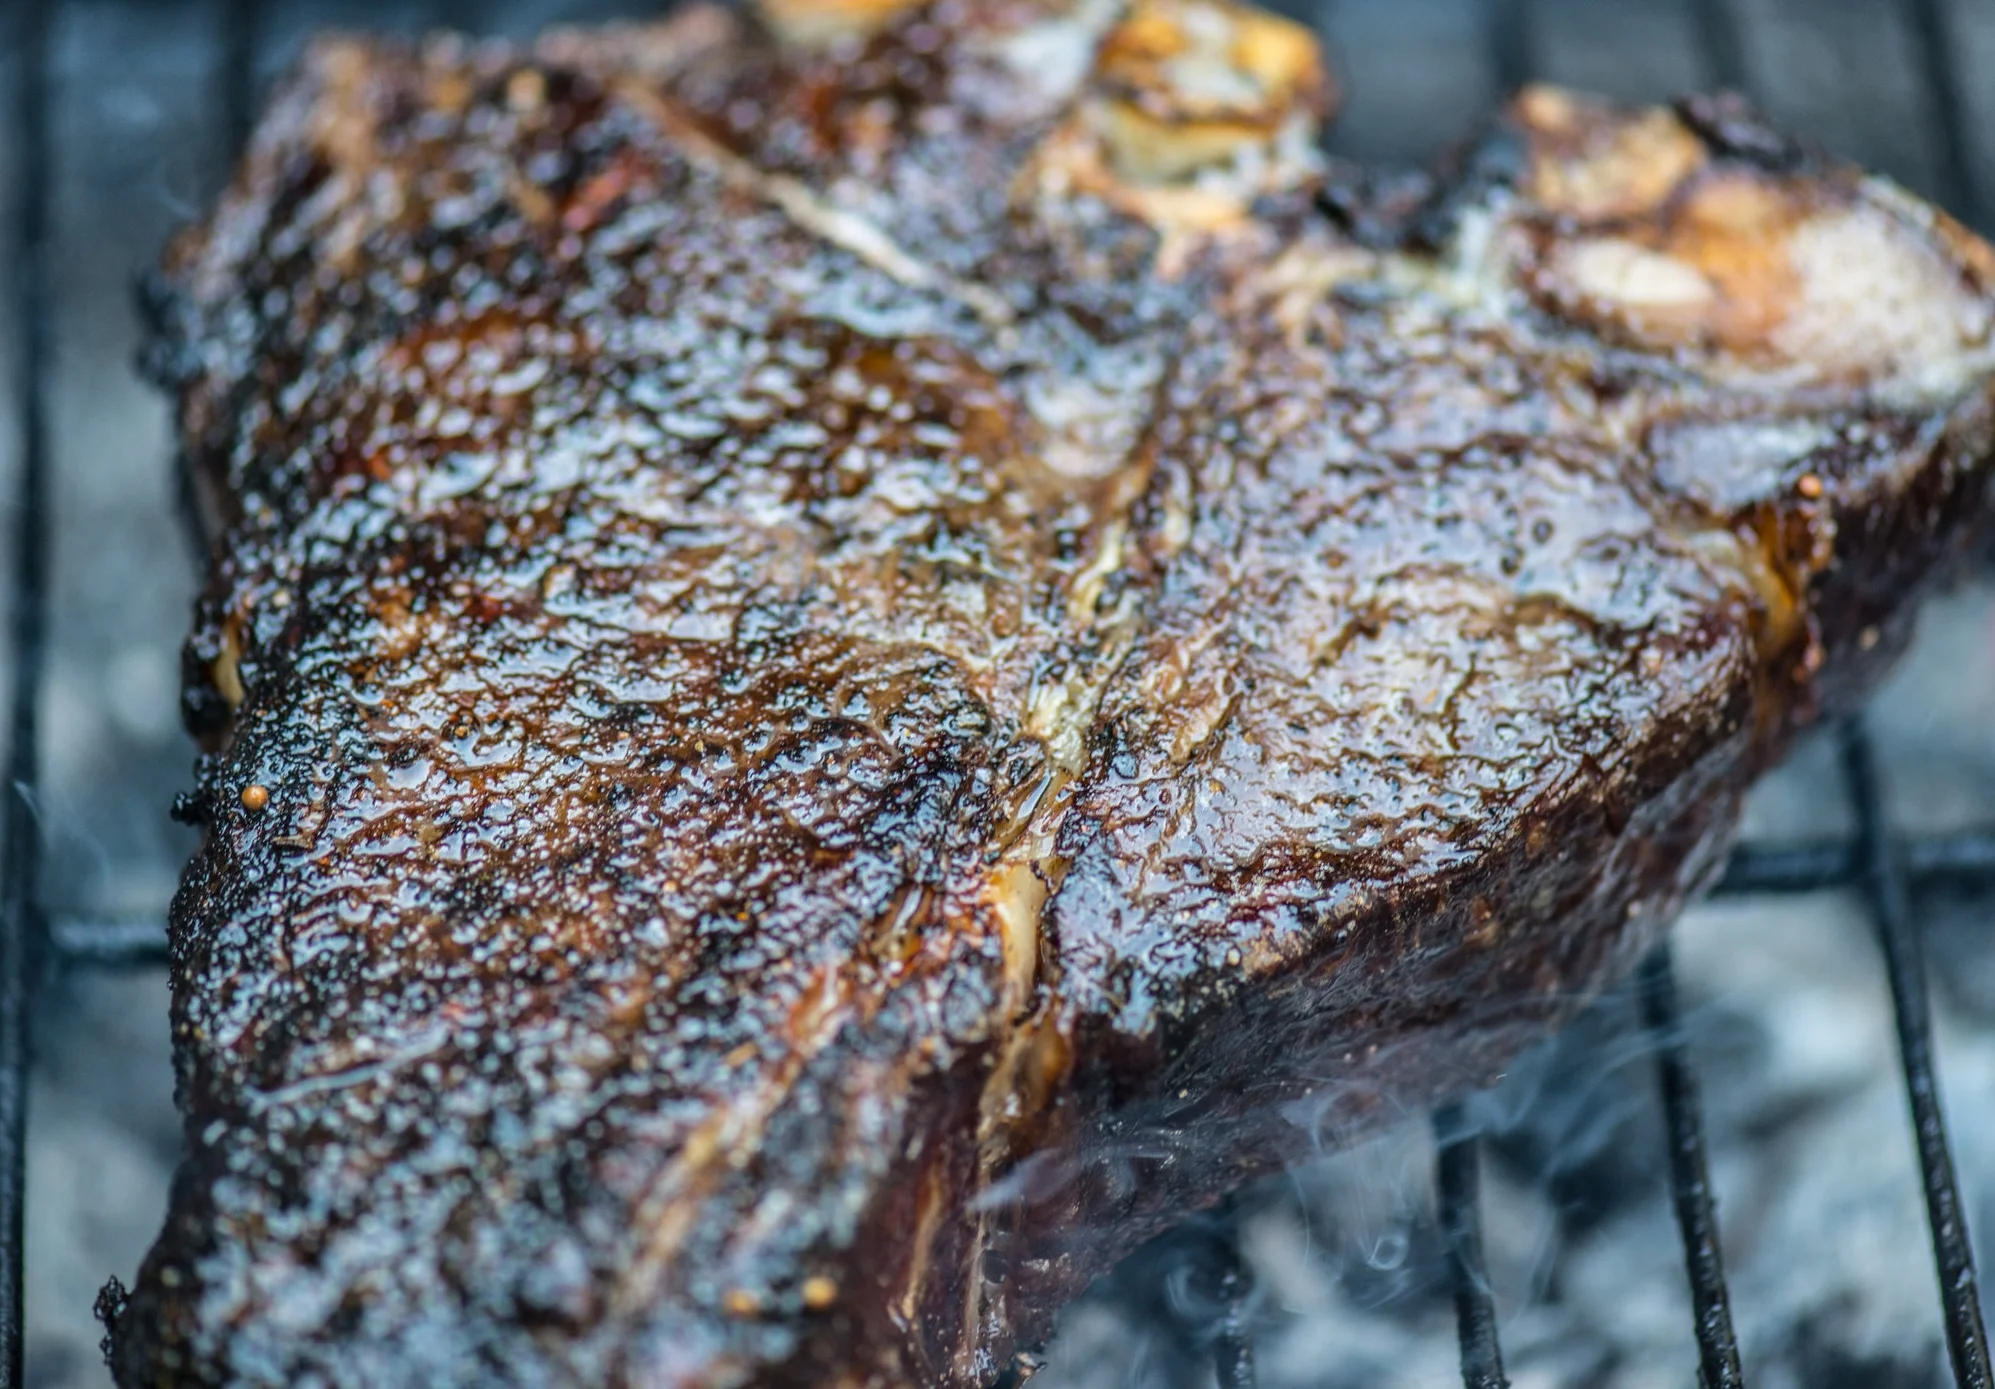
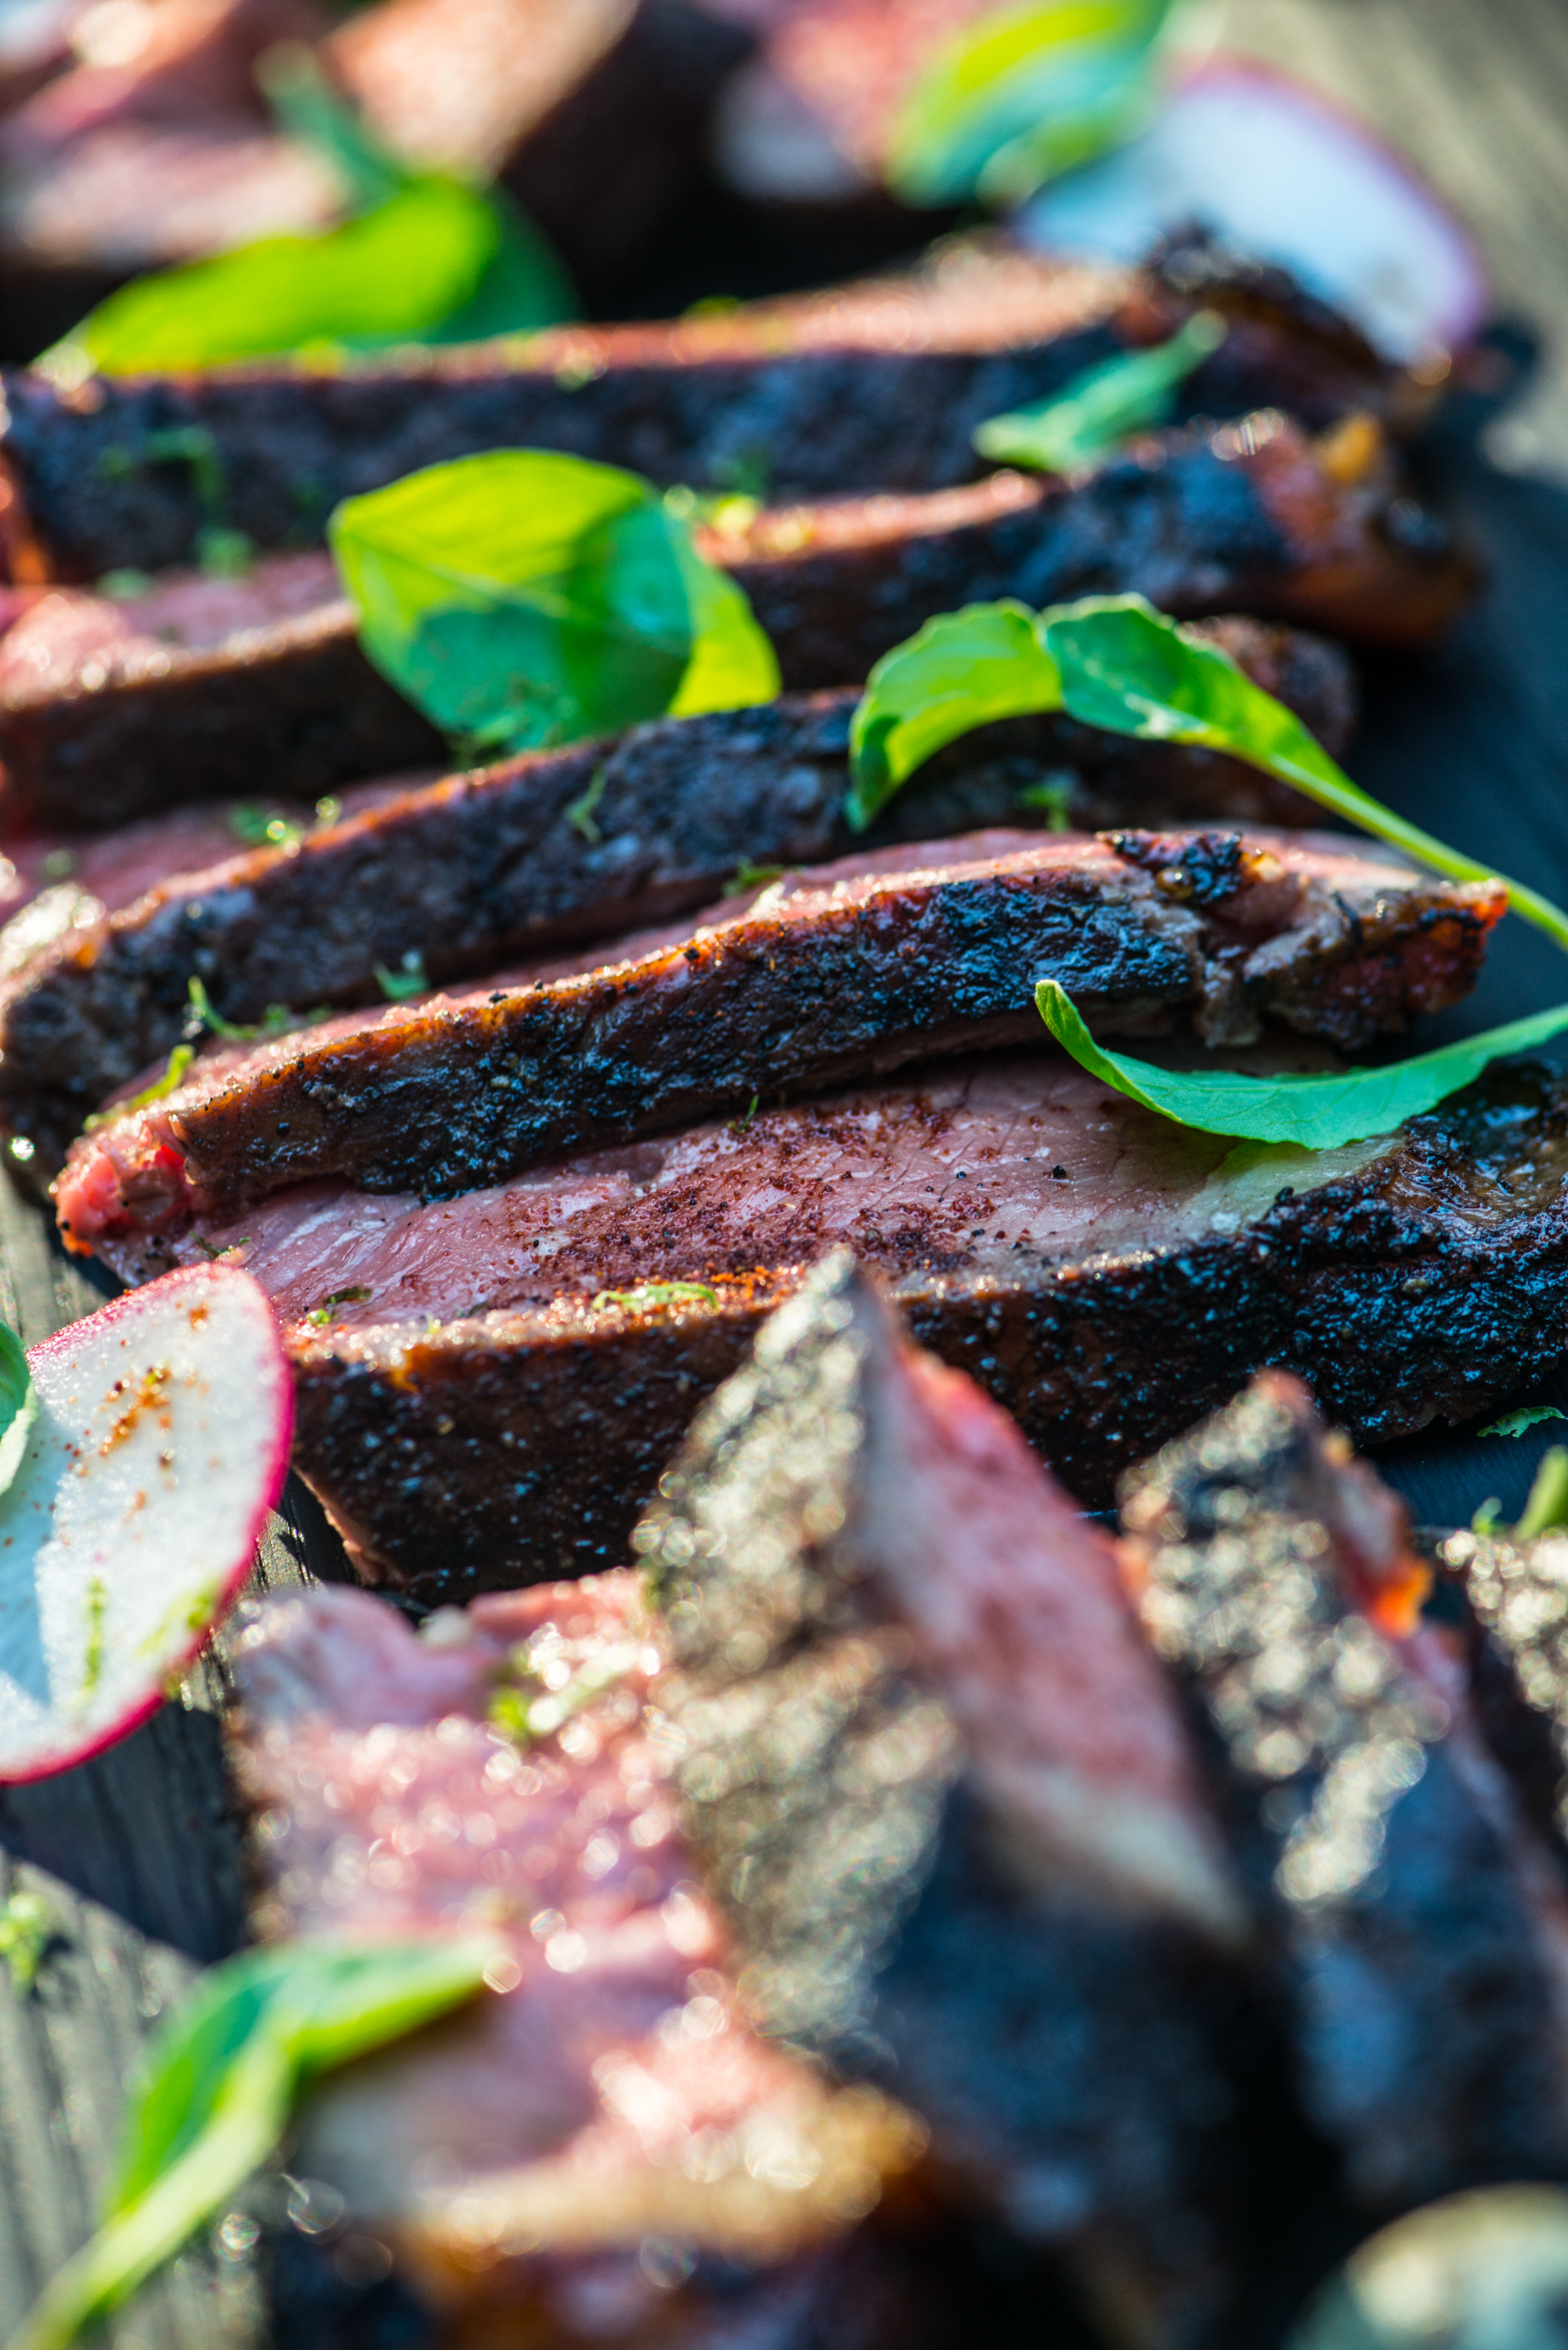
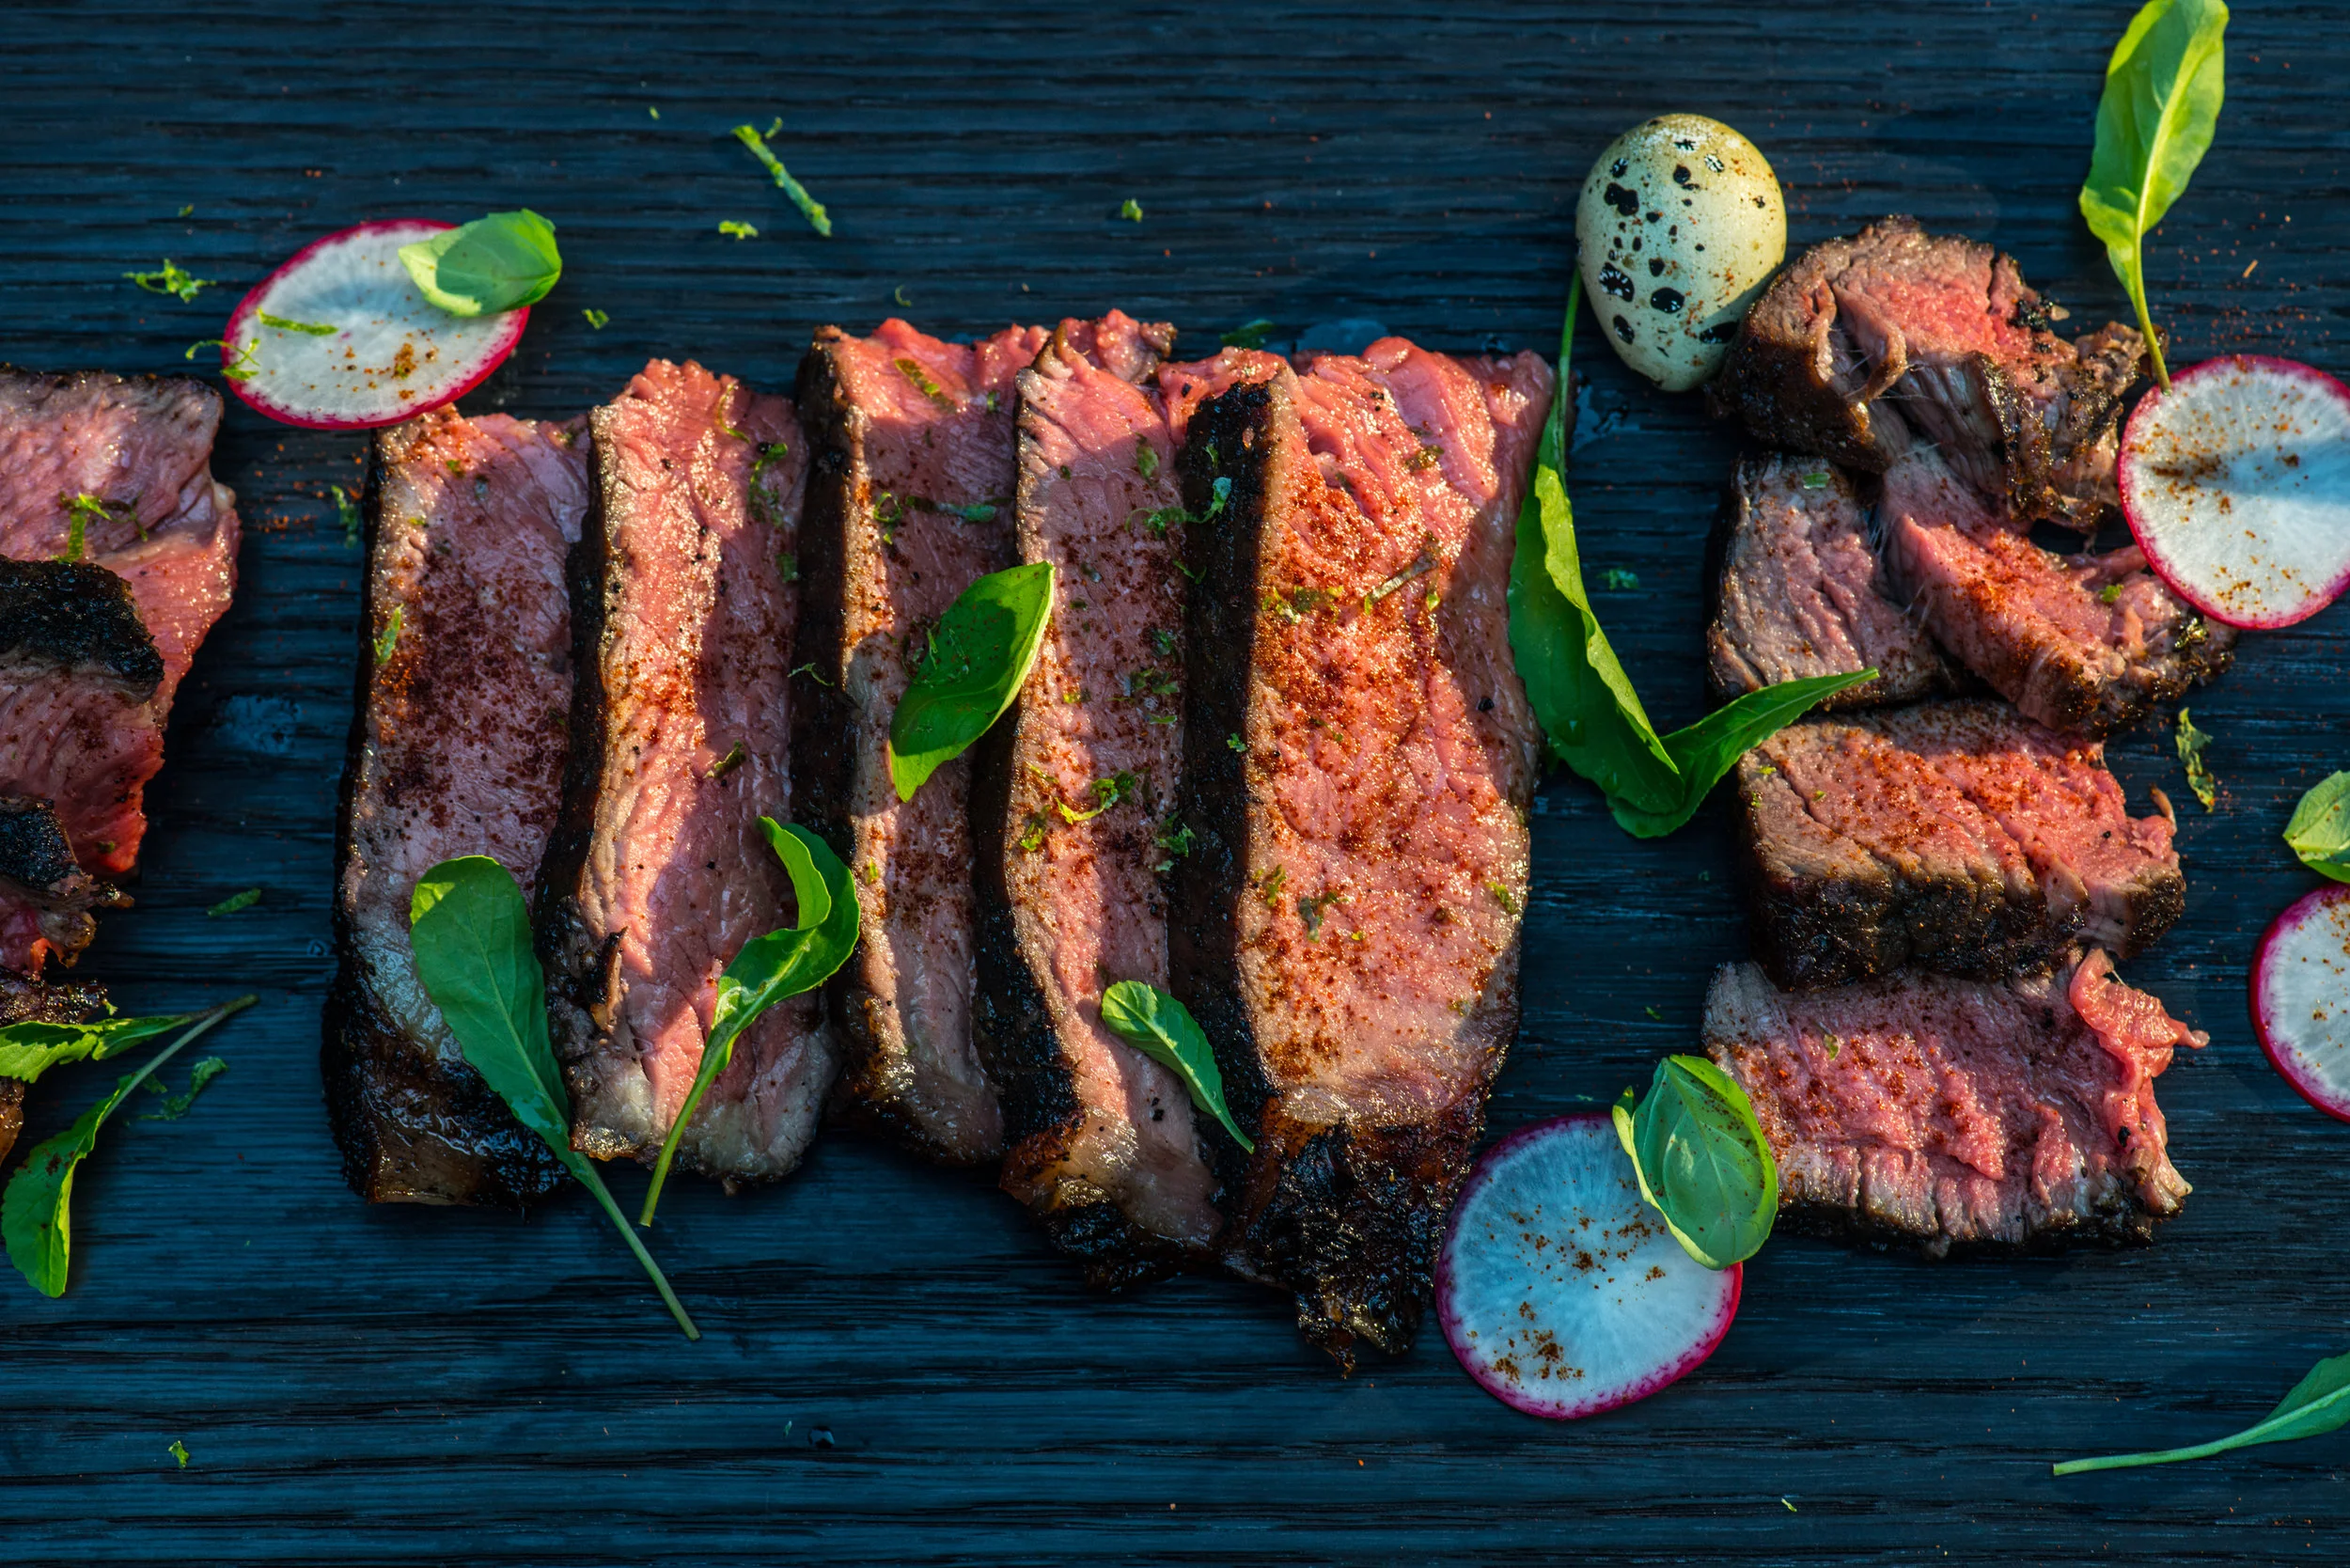
You'll know it's done when the meat starts to thicken up, and the fat is nicely caramelized. I love the thumb trick for meat temp, but if you need it, use a thermometer. Rare is around 120, going up to 160 for well done. I like mine on the lower end of medium rare, so I like it to be about as firm as the flexor muscle of your thumb (the middle of the thumb pad in your palm).
...Ok now for the last, and extremely important step,
LET IT REST!!
If you pull it off the grill and slice right into it, you're going to wind up with a plate full of juice, and if it's on your plate, guess where it's not?... in your steak! So, let is rest for about 5-10 mins, then cut into it. Start at the bone and cut straight down the length on both sides. If you've cooked it right, the filet and the strip should be very easy to separate from the bone. Once they are off, I like to clean off any thin or fatty skin that's left (which shouldn't be much) and then slice them up. Follow the cross bar of the T for the direction of the cut (against the grain as always). That will give you the best cut for the least amount of effort in chewing. At this point though, especially on the filet side, you can just look at it and it will dissolve into buttery goodness (just kidding, some chewing is required).
PLATING AND SERVING....
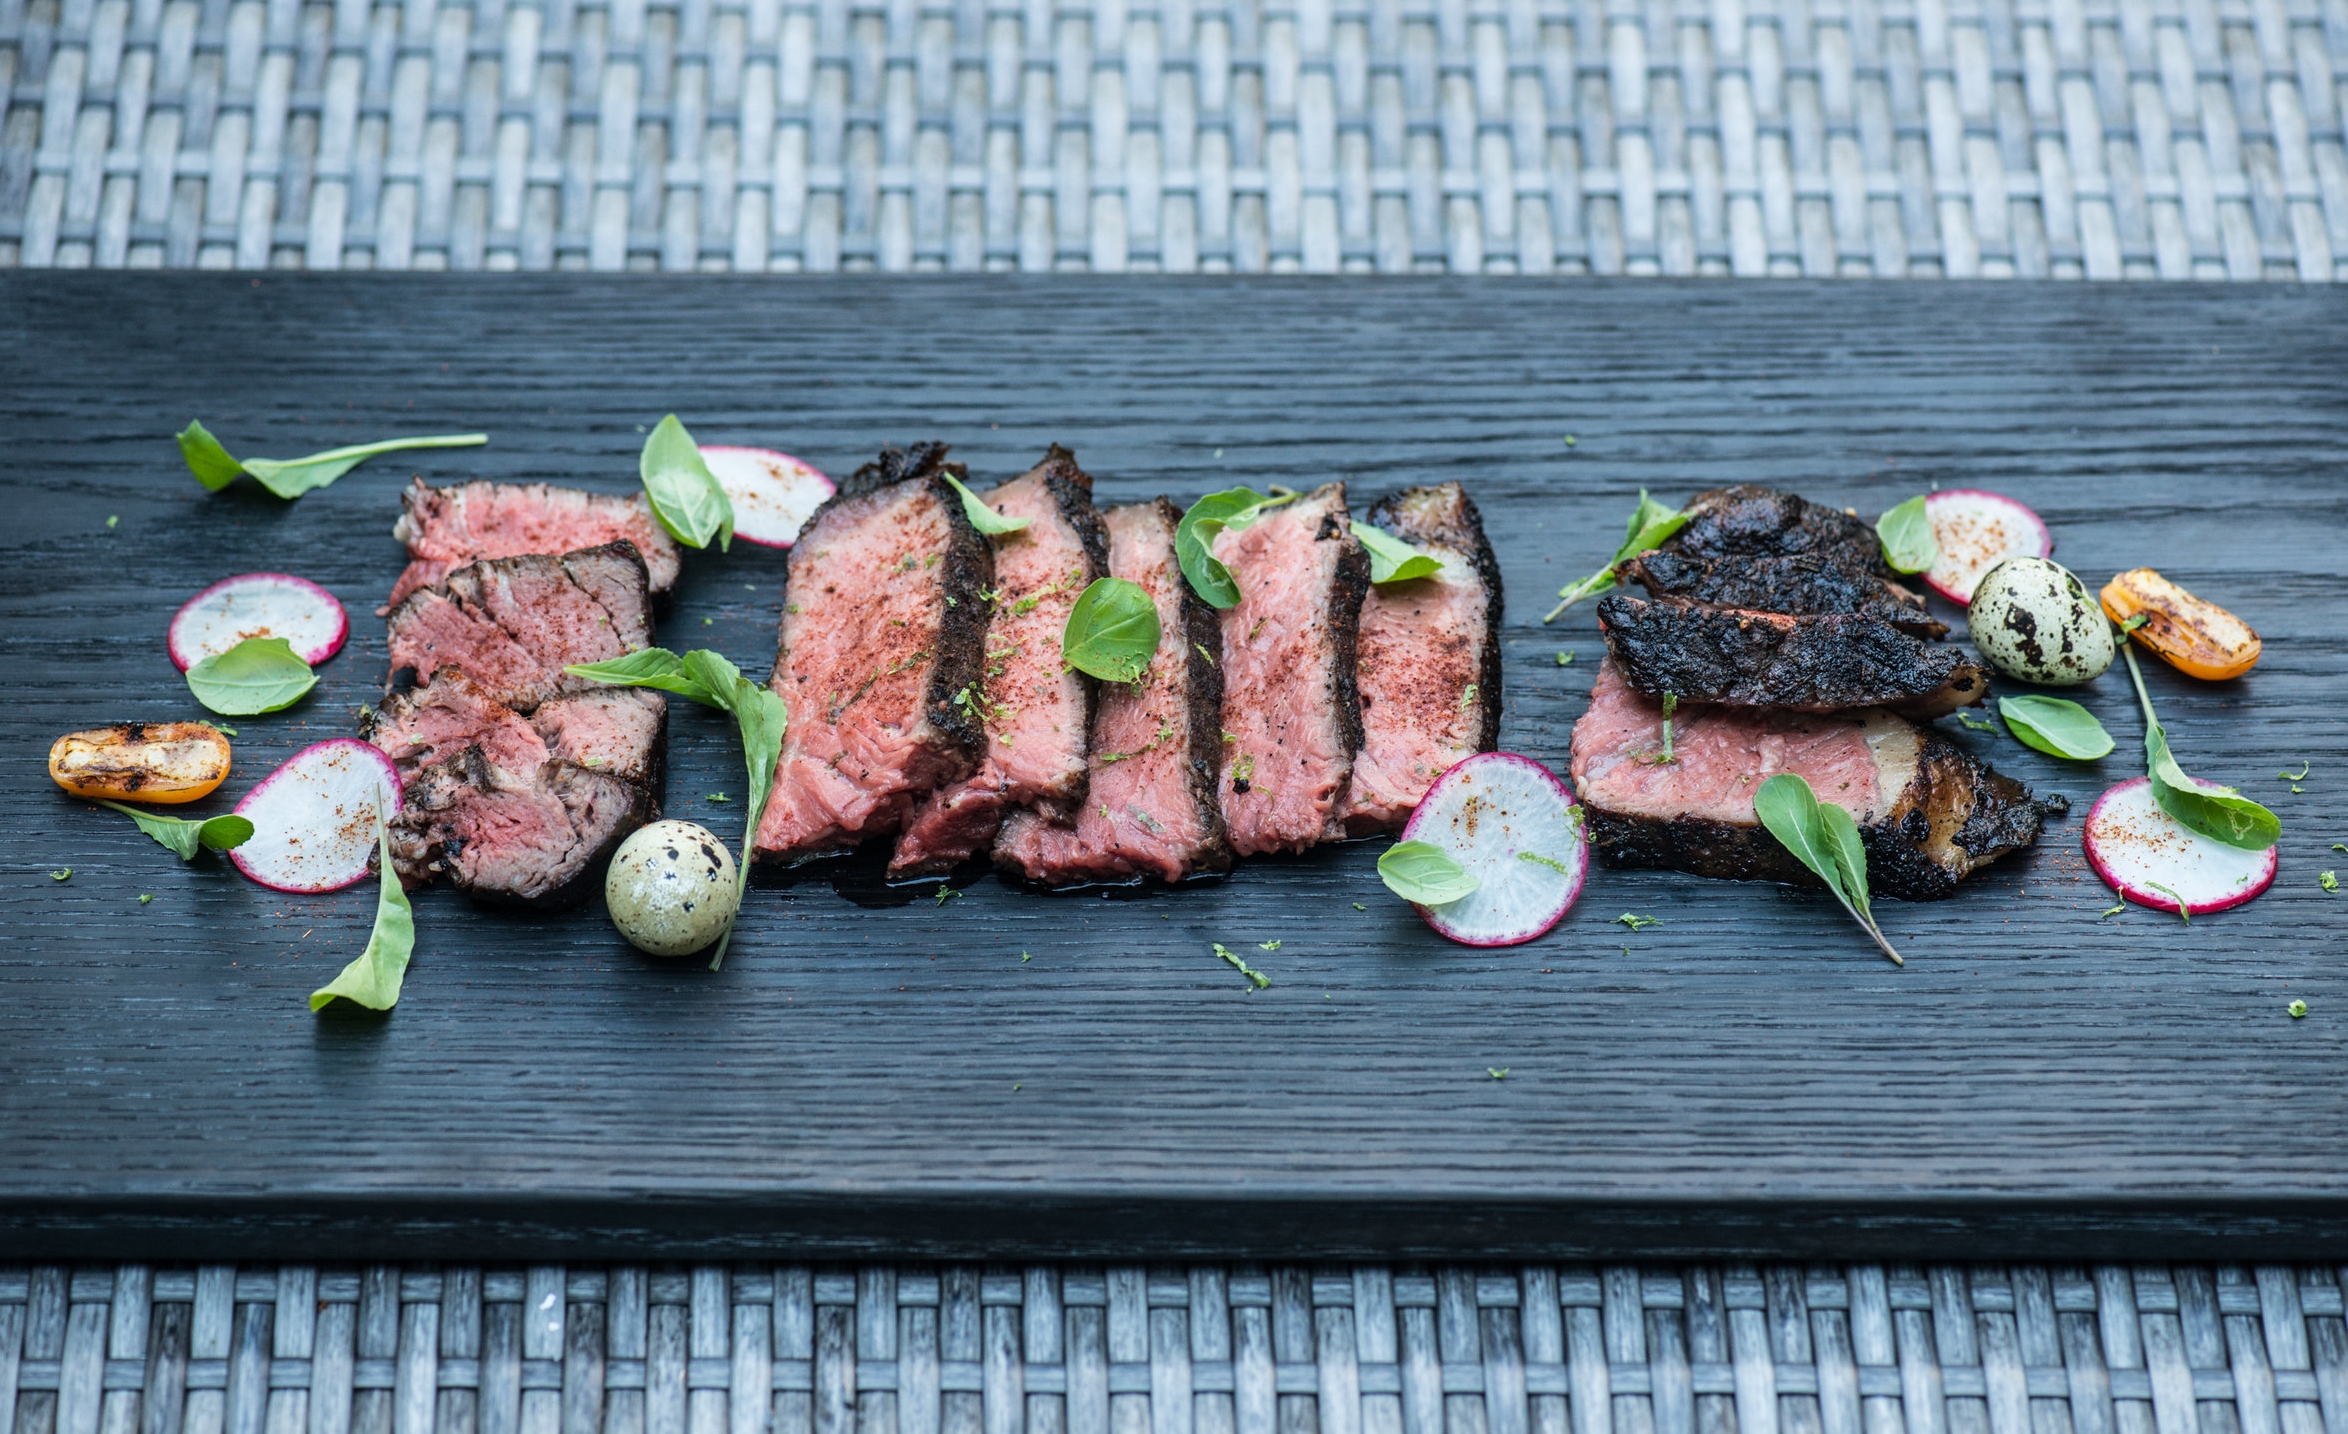
I like to serve family style on one of our large charred boards. The dark surface really lets the colors of the meat shine. This time I've take radishes, arugula and baby basil from our garden, with some smoked quail eggs, and a few tomatoes, dusted with spices and cheese and torched until crispy. Last but not least, a little more paprika and a little lime zest from a micro plane, and it's ready to disappear.
It may seem fancy, but it's just the basics, season right, cook right and make it look tasty (Black tie BBQ to the bone, especially on this one)....Hope you enjoy!
Cheers!
Matt & Alex.